Simple Pricing Table Using HTML And CSS
Last Updated : Jul 1, 2023
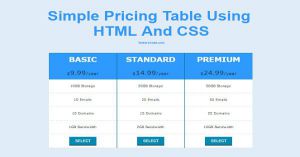
In this tutorial we will show you how to create pricing table using HTML and CSS just like you saw in many price comparing websites or also in web service websites when you compare different products with details in one page and all of them having a select button.
You may also like Create Responsive Table Using CSS

CHECK OUT THIS TUTORIAL LIVE DEMO →
To Create Pricing Table It Takes Only Two Steps:-
- Make a HTML file and define markup
- Make a CSS file and define styling
Step 1. Make a HTML file and define markup
We make a HTML file and save it with a name price.html
<html>
<head>
<link rel="stylesheet" href="price_style.css">
</head>
<body>
<div id="wrapper">

<div id="price_columns">
 <div class="columns">
  <li class="price_name">BASIC</li>
  <li class="price"><small>$</small><big>9.99</big><small>/year</small></li>
  <li class="detail">10GB Storage</li>
  <li class="detail">10 Emails</li>
  <li class="detail">10 Domains</li>
  <li class="detail">1GB Bandwidth</li>
  <li class="select_button"><input type="button" class="select_price" value="SELECT"></li>
 </div>

 <div class="columns" id="second_col">
  <li class="price_name">STANDARD</li>
  <li class="price"><small>$</small><big>14.99</big><small>/year</small></li>
  <li class="detail">20GB Storage</li>
  <li class="detail">20 Emails</li>
  <li class="detail">15 Domains</li>
  <li class="detail">2GB Bandwidth</li>
  <li class="select_button"><input type="button" class="select_price" value="SELECT"></li>
 </div>

 <div class="columns">
  <li class="price_name">PREMIUM</li>
  <li class="price"><small>$</small><big>24.99</big><small>/year</small></li>
  <li class="detail">50GB Storage</li>
  <li class="detail">50 Emails</li>
  <li class="detail">25 Domains</li>
  <li class="detail">10GB Bandwidth</li>
  <li class="select_button"><input type="button" class="select_price" value="SELECT"></li>
 </div>
</div>

</div>
</body>
</html>
In this step we create three columns for different service price basic, standard and premium
with different service details and create a button to select the service for each this button is just a dummy.
We also add price_style.css file which we were going to create in next step.You may also like jQuery Table Sort
Step 2. Make a CSS file and define styling
We make a CSS file and save it with a name price_style.css
body
{
 text-align:center;
 width:100%;
 margin:0 auto;
 padding:0px;
 font-family:helvetica;
 background-color:#E0ECF8;
}
#wrapper
{
 text-align:center;
 margin:0 auto;
 padding:0px;
 width:995px;
}
#price_columns
{
 float:left;
 margin-left:45px;
}
.columns
{
 float: left;
 width: 300px;
 box-sizing:border-box;
 background-color:white;
 font-family: Verdana,sans-serif;
}
#second_col
{
 border-left:2px solid #086A87;
 border-right:2px solid #086A87;
}
.columns .price_name
{
 background-color: #2E9AFE;
 color: white;
 font-size: 35px;
 border:none;
 font-weight:bold;
}
.columns .price
{
 background-color: #2E9AFE;
 color: #0B2F3A;
 font-size: 25px;
 border: none;
}
.columns li
{
 list-style-type:none;
 border-bottom: 1px dashed #CEE3F6;
 height:70px;
 line-height:70px;
 text-align: center;
}

.columns .grey
{
 background-color: #eee;
 font-size: 20px;
}

.columns .select_price
{
 background-color: #0489B1;
 border:none;
 border-bottom: 5px solid #0B4C5F;
 color: white;
 width:120px;
 height:45px;
 font-size: 17px;
 border-radius:2px;
}
You can also use our Price Range Slider
with this code to give more functionality to your user.
Thats all, this is how to create simple pricing table using HTML and CSS.You can customize this code further as per your requirement. And please feel free to give comments on this tutorial.
I hope this tutorial on pricing table using HTML and CSS helps you and the steps and method mentioned above are easy to follow and implement.


