


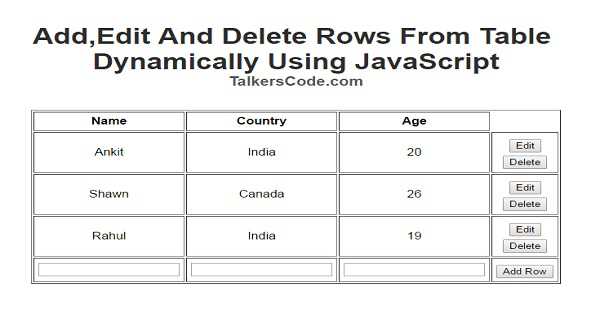
Add,Edit And Delete Rows From Table Dynamically Using JavaScript
Last Updated : Jul 1, 2023
IN - JavaScript HTML | Written & Updated By - Ashish
In this tutorial we will show you how to do different operations with table dynamically like add rows ,edit rows, delete rows and save the edited rows on table using javascript.
You may also like Add And Remove Textbox Using JavaScript
CHECK OUT THIS TUTORIAL LIVE DEMO →
To Add,Edit And Delete Rows From Table Dynamically It Takes Only Two Steps:-
- Make a HTML file and define markup
- Make a js file and define scripting
Step 1. Make a HTML file and define markup
We make a HTML file and save it with a name table.html
<html>
<head>
<script type="text/javascript" src="table_script.js"></script>
</head>
<body>
<div id="wrapper">
<table align='center' cellspacing=2 cellpadding=5 id="data_table" border=1>
<tr>
<th>Name</th>
<th>Country</th>
<th>Age</th>
</tr>

<tr id="row1">
<td id="name_row1">Ankit</td>
<td id="country_row1">India</td>
<td id="age_row1">20</td>
<td>
<input type="button" id="edit_button1" value="Edit" class="edit" onclick="edit_row('1')">
<input type="button" id="save_button1" value="Save" class="save" onclick="save_row('1')">
<input type="button" value="Delete" class="delete" onclick="delete_row('1')">
</td>
</tr>

<tr id="row2">
<td id="name_row2">Shawn</td>
<td id="country_row2">Canada</td>
<td id="age_row2">26</td>
<td>
<input type="button" id="edit_button2" value="Edit" class="edit" onclick="edit_row('2')">
<input type="button" id="save_button2" value="Save" class="save" onclick="save_row('2')">
<input type="button" value="Delete" class="delete" onclick="delete_row('2')">
</td>
</tr>

<tr id="row3">
<td id="name_row3">Rahul</td>
<td id="country_row3">India</td>
<td id="age_row3">19</td>
<td>
<input type="button" id="edit_button3" value="Edit" class="edit" onclick="edit_row('3')">
<input type="button" id="save_button3" value="Save" class="save" onclick="save_row('3')">
<input type="button" value="Delete" class="delete" onclick="delete_row('3')">
</td>
</tr>

<tr>
<td><input type="text" id="new_name"></td>
<td><input type="text" id="new_country"></td>
<td><input type="text" id="new_age"></td>
<td><input type="button" class="add" onclick="add_row();" value="Add Row"></td>
</tr>

</table>
</div>

</body>
</html>
In this step we create a table and insert some sample rows of data and create 3 buttons for every row edit, save and delete and insert table_script.js file which we were going to made in next step.
You may also like Check And Uncheck Checkboxes Using JavaScript
Step 2. Make a js file and define scripting
We make a js file and save it with a name table_script.js
function edit_row(no)
{
 document.getElementById("edit_button"+no).style.display="none";
 document.getElementById("save_button"+no).style.display="block";

 var name=document.getElementById("name_row"+no);
 var country=document.getElementById("country_row"+no);
 var age=document.getElementById("age_row"+no);

 var name_data=name.innerHTML;
 var country_data=country.innerHTML;
 var age_data=age.innerHTML;

 name.innerHTML="<input type='text' id='name_text"+no+"' value='"+name_data+"'>";
 country.innerHTML="<input type='text' id='country_text"+no+"' value='"+country_data+"'>";
 age.innerHTML="<input type='text' id='age_text"+no+"' value='"+age_data+"'>";
}

function save_row(no)
{
 var name_val=document.getElementById("name_text"+no).value;
 var country_val=document.getElementById("country_text"+no).value;
 var age_val=document.getElementById("age_text"+no).value;

 document.getElementById("name_row"+no).innerHTML=name_val;
 document.getElementById("country_row"+no).innerHTML=country_val;
 document.getElementById("age_row"+no).innerHTML=age_val;

 document.getElementById("edit_button"+no).style.display="block";
 document.getElementById("save_button"+no).style.display="none";
}

function delete_row(no)
{
 document.getElementById("row"+no+"").outerHTML="";
}

function add_row()
{
 var new_name=document.getElementById("new_name").value;
 var new_country=document.getElementById("new_country").value;
 var new_age=document.getElementById("new_age").value;

 var table=document.getElementById("data_table");
 var table_len=(table.rows.length)-1;
 var row = table.insertRow(table_len).outerHTML="<tr id='row"+table_len+"'><td id='name_row"+table_len+"'>"+new_name+"</td><td id='country_row"+table_len+"'>"+new_country+"</td><td id='age_row"+table_len+"'>"+new_age+"</td><td><input type='button' id='edit_button"+table_len+"' value='Edit' class='edit' onclick='edit_row("+table_len+")'> <input type='button' id='save_button"+table_len+"' value='Save' class='save' onclick='save_row("+table_len+")'> <input type='button' value='Delete' class='delete' onclick='delete_row("+table_len+")'></td></tr>";

 document.getElementById("new_name").value="";
 document.getElementById("new_country").value="";
 document.getElementById("new_age").value="";
}
In this step we made 4 functions to perform different operation in table.We will explain all these functions one by one. In first function that is edit_row() function is used to edit rows.
In this function we get row id in 'no' variable and then we hide and edit button and display the save button then we get all the data of edit row and insert the textbox with data in edit row to make rows editable.
You may also like add, edit and delete records using jQuery, ajax, PHP and MySQL.
In second function that is save_row() function is used to save the edited row.In this function we get the value of all three text box inside edit rows and insert the data in row when user clicks on save button and then change the display option of edit and save button.
In third function that is delete_row() function is used to delete particular rows when user clicks of delete button of their respective row.
In fourth function that is add_row() function is used to add new rows to table.
In this function we get the value of all the three new textbox used to insert data then we insert the row in last-1 position beacause in our case last position in filled by our three textboxes thats why we use -1 to insert the new row before the new textbox row and the we clear the three new textbox field.
You may also like delete multiple records from MySQL using PHP.
Thats all, this is how to Add, Edit And Delete Rows From Table Dynamically Using JavaScript. You can customize this code further as per your requirement. And please feel free to give comments on this tutorial.
I hope this tutorial on javascript dynamic table helps you and the steps and method mentioned above are easy to follow and implement.
 About Ashish
Ashish is a dynamic and motivated individual with a passion of programming and an experienced programmer having 3+ years of experience in various languages like Java, Python, HTML, CSS, JavaScript, jQuery and various frameworks like Bootstrap
RELATED TUTORIALS
 Add,Edit And Delete Rows From Table Dynamically Using JavaScript
 Expand Table Rows Using jQuery, HTML And CSS
 Create, Edit And Delete File Using PHP And HTML
 Add, Edit And Delete Records Using jQuery, Ajax, PHP And MySQL
 Show Hide Table Column Using JavaScript
 Read And Delete File From Folder Using PHP
 Delete Multiple Records From MySQL Using PHP
 Simple And Best Delete Confirmation Message Using jQuery HTML And CSS
 Sort MySQL Table Using PHP
 Sort Table Using jQuery