How To Add Menu In WordPress Admin Dashboard
Last Updated : Mar 11, 2024
IN - WordPress | Written & Updated By - Pragati

In this article we will show you the solution of how to add menu in WordPress admin dashboard, drop-down menus, or submenus, appear when you hover over an item on your menu.
Clean and organized menus can be maintained with them. Here is a guide for creating drop-down menus.
These themes come with a site editor that you can use to edit all aspects of your site at once.
A navigation menu can be easily added to your WordPress site using the built-in menu management system. Navigation menus are usually located next to your logo at the top of your website.
Over the menu item, a toolbar will appear, containing the Add submenu button (a curved arrow with three horizontal lines).
An icon that looks like a literal chain link will appear in the toolbar above the menu item.
Creating dropdown menus is easier when you create "unclickable" menu items. There will be no new page launched when you click the item.
A custom menu item's title appears in this field. Whenever someone visits your website/blog, this is what they will see. You can view the post or page by clicking the link to the original source.
Hidden items include those listed below. The required fields can be displayed by using Screen Options. A menu item's alternative text (Alt text) is specified in this field.
Use either the pull-down menu to select "New window or tab" or "Same window or tab."
The menu item can have optional CSS classes. Automatically generates XFN attributes for displaying your relationship to the site owner or author. To learn more about link relationships, click here.
Organizing your menu like a formal report helps you to visualize each menu item as a heading.
Headings of the main sections (Level 1) appear farthest to the left of a formal report; headings of subsections.
Step By Step Guide On How To Add Menu In WordPress Admin Dashboard :-
- You can customize the menus by navigating to Appearance > Customize.

- Menus are available.

- Then Select the items you want to add.

- Then Select Custom Links from the menu.

- Click on the right-hand image and enter the # symbol in the URL field.

- As shown in the image on the right, enter the text you wish to appear in your menu in the Link Text field.
- The Add to Menu button will appear.
- After making the changes, click Save.

Conclusion :-
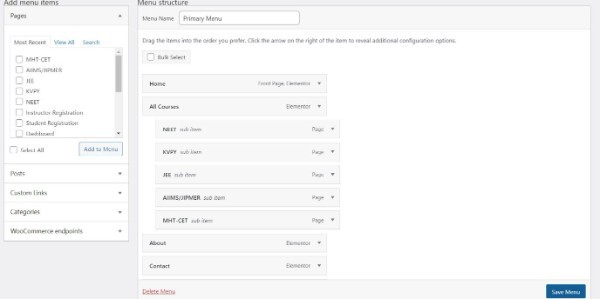
Multi-level menus can be created using the WordPress menu editor by dragging and dropping.
Adding sublevels to your menu is as easy as dragging items left or right.
Subordinate menu items are placed beneath their parents and dragged right, making them look like a child.
A custom menu item's title appears in this field. Whenever someone visits your website/blog, this is what they will see.
You can view the post or page by clicking the link to the original source. Hidden items include those listed below. The required fields can be displayed by using Screen Options.
A menu item's alternative text (Alt text) is specified in this field.
I hope this article on how to add menu in WordPress admin dashboard helps you and the steps and method mentioned above are easy to follow and implement


